

What you need to know before removing the old engine.
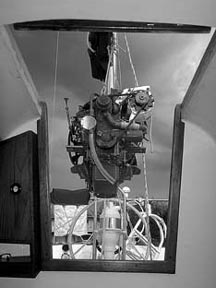
20-hp Beta swings into a C&C 30
The engine and shaft must be in precise alignment. This is the only hard, fast rule for installing a new engine in an old boat. Everything else you make up as you go along. I pass this on to you with the authority of having just repowered our own good old boat. I am also pleased to tell you the process turned out to offer fewer opportunities for disaster than I had imagined.
Why repower?
Until recently, repowering a sailboat nearly always meant replacing a gasoline-fueled engine with a diesel. Today, the engine coming out is nearly as likely to be a diesel. Sometimes the owner simply wants more power, but more often, the replacement has to do with either the cost or availability of parts for the old engine. My own experience is a case in point.
Our old boat, an Allied Seawind, came from the factory with a 20-horsepower Albin AD-2, a Swedish diesel as dependable as a St. Bernard and as rugged as stone. But after 30 years of service, the time for a major overhaul was at hand.
In common with a lot of other European diesels of the same era, Albin has almost disappeared in America. There was no place that I was willing to take the engine for a rebuild. And even if I could get the job done in a monastery workshop, then what? Already I had seen water-pump impellers out of stock for nearly a year. If I couldn’t get the most common replacement part now, what were the odds of getting a rocker arm in Trinidad five years from now? All things considered, a new engine promised to be the better choice.
How much power?
The first step in selecting an engine is determining horsepower requirements. Skene’s Elements of Yacht Design, by Francis Kiney, and Dave Gerr’s Propeller Handbook both contain formulas that allow you to estimate power requirements based on displacement and waterline length, but it is important not to overvalue such calculations. They only tell you the theoretical horsepower needed to push your boat through smooth water. Punching through waves requires additional power. So does motoring against a breeze. Or overcoming a foul bottom. If the displacement amount doesn’t include the weight of equipment, supplies, and crew, the calculations understate power requirements. And they assume a propeller with more surface area than you may want to drag around under sail.
The truth is these formulas are a migraine you don’t need. They are going to tell you that you need about 2 horsepower per 1,000 pounds of displacement. (Editor’s note: We used Dave Gerr’s formulas for calculating our own power requirements when repowering. We found them to be useful and comforting. In the end, we selected an engine with about 2 horsepower per 1,000 pounds of all-up cruising weight.) How can I know that in advance? Because the game is fixed. The only variable is the speed-length ratio, and virtually all displacement sailboats have a theoretical speed-length ratio of about 1.3.
Since you are repowering, you can also deduce your power requirement empirically. How satisfactory was the old engine? If, for example, the old engine was anemic against a breeze, you need a bit more horsepower this time. On the other hand, if you never saw the tachometer above 2,000 rpm, a look at the engine’s output curve (example on next page) will show how much horsepower you have been getting along with.
In our case, the 2-horsepower rule yielded 24 horsepower, but I already knew that 20 would push us along smartly in smooth water. A few times, extra ponies would have been reassuring, but the rest of the time a bigger engine would be loafing. Because diesel engines do better under load, I felt reluctant to add power, but the particular engine I wanted was available in either a 16-horsepower, 2-cylinder version, or as a 24-horsepower, 3 cylinder. (Note: These are continuous horsepower ratings. Advertised ratings often are intermittent horsepower – meaning you can run the engine at that load for no more than one hour. Intermittent horsepower is typically 10 to 15 percent higher than continuous horsepower.)
Ultimately, I settled on the 24-horsepower motor, and my somewhat convoluted logic might be helpful. The primary issue for me was idling, not powering. For years, we had run the old engine at anchor for up to two hours a day to keep the batteries charged and the holding plates frozen. A smaller engine would better tolerate this light load, and had we intended to continue accumulating most of our engine hours at anchor, I would have installed the smaller engine.
However, we have abandoned the main engine for refrigeration and primary charging, using it only for propulsion. With no compressor belted off the new engine, 16 horsepower still would likely have been adequate-just. However, the one-time-only opportunity of banking 50 percent more power for an additional investment of about a grand carried the day.
A 240-pound engine is hoisted in using the boat’s running rigging. The mainsheet tackle is connected to the main halyard, and the vang tackle pulls the engine toward the boom end. NOTHING hangs from the middle of this boom. Check the safe working load of your gear before you do this.
It is common practice to factor in additional horsepower for engine-driven accessories such as a high-output alternator, a refrigeration compressor, or a watermaker. This, I think, is unnecessary and probably even undesirable, except for engines under 10 horsepower. At less than full throttle, the propeller absorbs considerably less horsepower than the engine can produce, so plenty of extra power is available. You can determine how much from the spread between the engine power curve and the one for the propeller. Or, if your old engine is a diesel, multiply your average fuel consumption (in gallons per hour) times 16 to arrive at the average load on the engine in horsepower. (We can make this calculation because 1 gallon of diesel fuel will produce around 16 horsepower for 1 hour.) If, for example, your usual consumption is 0.5 gallon per hour, you are using only about 8 horsepower. The difference between this number and the continuous horsepower rating of the engine is unused capacity. It just makes sense to make use of this excess before adding dedicated capacity.
Loading the engine more heavily more of the time also extends its life. On those rare occasions when you want all the engine’s power available at the prop, it is a simple matter to turn off the auxiliary loads. For those unswayed by this logic, in the absence of specific power requirements for these auxiliary loads, a 2-horsepower allowance for each won’t be far off.
Which engine?
After you arrive at the target horsepower, the next choice is whose engine to buy. Here the primary issue may be fit, but probably not size. Today’s engines are nearly all smaller than older engines of similar or slightly less horsepower. The main fit issue is the location of the output flange.
The engine and shaft must be in precise alignment.
With battens, a tape measure, and a few body contortions, you should be able to determine the height of the shaft relative to the engine bed. While you are bent like that, also measure the length, individual width, and center-to-center width of the bed stringers. Wait, don’t straighten out yet. How far below the stringers can the engine extend? How much room do you have above the stringers? Now get all these dimensions on paper, and you are ready to qualify or rule out any engine you may be considering.
Access is another concern. If you can only get to one side of the engine, you want filters, pumps, and dipsticks on that side. Will you be able to service the starter without removing the engine? Will there be room above the valve cover for an upturned oil container?
If your budget has you contemplating a seawater-cooled engine, snap out of it. Unless you use the engine only in fresh water, seawater cooling is a bad idea. Scale will form in the cooling passages, eventually leading to overheating. Running the engine at lower temperatures to retard scaling only postpones the inevitable, and it reduces the engine’s efficiency. Freshwater cooling has become the norm for good reason.
Because a diesel doesn’t require electricity to run, hand-starting is an attractive feature. Dead battery? Get out the crank. It’s a nice fantasy, but the reality is that sailboat installations rarely allow adequate room to spin the crank safely. Make sure yours does before fretting over the absence of this feature. An extra battery or a small generator in the lazarette accomplishes the same thing without the risk of broken bones.
The fact that I was replacing an engine perfectly capable of delivering another 30 years of reliable service, if parts for it were still available and/or affordable, colored my decision from the start. I wanted an engine that had already been installed by the thousands, by the tens of thousands, reasoning that this was our best assurance of wide and long parts availability. For our size boat, that engine was the Yanmar GM series.
Reliability was equally important, so I made inquiries. No owner I talked with had a single negative thing to say about the engine. This should not be construed to suggest that Yanmar engines are more reliable than competitive brands, but it did give me assurance that they are no less reliable. Once I was satisfied that the engine would fit, my choice was pretty well set.
Price, by the way, played no part in my choice. I reasoned that $1,000 difference one way or the other, amortized over 30 years, works out to $33 a year. That was insufficient for me to make any compromises. That did not, however, keep me from negotiating the best price I could on the engine I wanted.
Buy the book
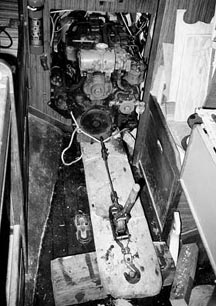
500 pounds of Swedish cast iron walks the plank.
With the project still months down the road, there was no need to make a firm commitment, but I was sure enough about the Yanmar that I decided to ask about the availability of an installation manual.
Early on I had the good fortune of meeting Mike Muessel, president of Oldport Marine Services in Newport, R.I. Taking unfair advantage of Mike’s enthusiastic nature, I had committed him to become my technical advisor. (Both my engine installation and this article have benefited greatly from Mike’s wise and willing advice.) So I called Mike to inquire about getting an installation manual in advance.
“Good plan,” Mike said. “And Yanmar’s is a good one.”
That turned out to be an understatement. The well-illustrated step-by-step instructions were not only clear but reassuring. In addition, the 250-page manual was a treasure-trove of helpful information, providing specific shaft and prop recommendations, detailed engine specifications, and complete wiring diagrams. Only twice during the project did this manual fail to answer every question that popped into my buzzing brain. These were resolved with quick email messages to Mike.
Whatever engine you select, buy the installation manual in advance; then, with a yellow highlighter in hand, read it cover to cover. It will save you the discomfort of uncertainty and maybe the misery of error.
Repowering afloat
It is quite possible to repower at the dock and, having the “ground” more or less at deck level, makes it relatively easy to transfer the engines to and from shore using the boat’s blocks, winches, and lines. Wrap the boom directly above the companionway with a carpet scrap or beach towel, and attach both the main halyard and the topping lift to a strop around the boom at this location. Put both masthead lines under tension to support the boom.
A chain hoist, or, with care, a multipart tackle (the main sheet) rigged beneath the boom to the strop lets you lift the engine out of the cabin and swing it into the cockpit or onto the cabintop. If you are using a tackle, take the tail through a turning block to a winch. When the engine is on deck, reposition the strop farther aft, and you should be able to use the boom to swing the engine ashore onto a waiting dolly. Reverse the process to get the new engine aboard.
Dockside repowering has less appeal when you have to remove the prop shaft. This generally involves a diver extracting the shaft while a helper inside slips a dowel or capped pipe into the stuffing box to plug the hole. This can work as long as the new shaft is the same diameter as the old one, but ifyou are adding horsepower, you may need a larger shaft diameter. That means a new Cutless bearing and a new stuffing box, changes you don’t want to make in the water.
I think there are significant advantages to having the boat out of the water when repowering, regardless. Why?
The engine and shaft must be in precise alignment.
The process of aligning the engine is easier and infinitely more accurate if you can use a centering line that passes through the stern tube. I am going to explain this technique in detail, but it virtually assures a near-perfect alignment right out of the box, saving hours of tedious adjustment.
A second reason to have the boat out of the water is to thwart human nature. Engineering advances have resulted in shorter transmissions, so the weight of the engine moves aft if you bolt it to the existing shaft. It is almost always better to move the weight toward the center of the boat by positioning the engine as far forward as possible, but this requires a new, longer shaft. A larger-diameter shaft may also be indicated if the new engine is more powerful than the old one. Having the boat in the water makes it more likely that you will resist shaft replacement.
Even if the new engine mates perfectly with the old shaft, you still should pull the shaft and inspect it for wear and corrosion. And while the shaft is out anyway, it’s a good time to replace the Cutless bearing and repack the stuffing box. You may also want to replace the hose that connects the stuffing box to the stern tube. You won’t do any of these if the boat is in the water.
Removing the shaft
I decided to do the job high and dry in the boatyard. Step One was to extract the shaft. The prop had to come off first, so I borrowed a puller from the yard. Never try to flail the prop off with a hammer, but a few love taps on the center of the tensioned puller where it is pushing against the shaft can be effective at breaking the prop free from the taper. I put an indelible mark around the shaft where it exited the hull so I would be able to reposition it later.
Inside the boat, I backed off the adjustment nut on the stuffing box so the shaft would slide more easily. I also put another positioning mark on the shaft, this one where it disappeared into the coupling. To prevent the shaft key or anything else from dropping into the bilge, I spread a towel beneath the coupling. Then I freed the shaft from the coupling. There is a trick to this that, barring complications from corrosion, makes it a snap.
Loosen the clamp bolts or remove the setscrews and/or tap out the pin holding the shaft in the coupling. You can try to slide the shaft out of the coupling, but chances are it won’t budge. Mark both flanges so you can reassemble them with the same orientation, then unbolt the coupling and take it apart, sliding the shaft aft. Tape a strong spacer – a nut or a bolt – to the center of the transmission flange, then reassemble the coupling and tighten the bolts evenly. As the coupling bolts pull the shaft flange forward, the spacer prevents the shaft from coming with it, thus pressing the shaft out of the flange. Replace each spacer with a longer one – I eventually used sockets – until the shaft drops out of the coupling.
With the shaft free, I slid it out of the boat and set it aside for later. I also released the clamps around the stuffing box hose and twisted the hose free of the stern tube.
Freeing the engine
The next step is to disconnect the old engine from its web of attached cables, wires, and hoses. To avoid unwanted drama, start by unclamping the positive battery cable(s) and removing it (them) from the battery post(s).
I disconnected the exhaust hose next, to gain better access. Since I wanted the engine space to be totally empty for cleaning and painting, I also unclamped the exhaust system from the hull fitting and removed it in its entirety.
The only water connection was a hose to the raw water pump. On the other end of that hose was a screen filter with a glass housing, long on my list for replacement. I removed the filter, unclamped the thru-hull connection, and tossed the whole mess. Moving on to the fuel connection, I disconnected it first from the tank so it wouldn’t set up a siphon. For the same reason, I also disconnected the output side of the primary filter, using an old towel to catch the inevitable dribble from the line. Only then did I disconnect the feed to the engine. Using old fuel lines struck me as a bad way to save 20 bucks, so I dumped them. Yanmar promised a new Racor primary filter, so I removed the old cartridge-style Fram, drained it into a plastic jug, and gave the housing away. By the way, your preparation for repowering will have to include locating an appropriate disposal site for fuel and oil.
Control cables were next. The old controls were not compatible with the new engine, so as I disconnected each from the engine. I also detached it from the boat, removing all associated clamps, supports, and mechanisms. That left me with a few abandoned holes in the cockpit, which I closed with fiberglass patches.
The old engine had an amazing number of wires connected to it – starter and alternator connections, engine condition sensors, grounding wires, and a few unidentified interlopers. At first, I labeled each as I disconnected it, but I quickly came to my senses. The Yanmar installation manual showed a plug-together harness connecting the new engine to its accompanying instrument panel. The only existing wires that would be reconnected to the new engine were the battery cables. So out came the wire cutter, and I clipped the engine free of its wires in a matter of minutes. As it turned out, they all lead, one way or another, to the old instrument panel or ignition switch, and when I removed those, the engine space ended up empty of all wiring.
One word of caution: If you are using a smart regulator or have add-on meters, you will need to identify, label, and save the hook-ups for those items.
Out with the old
When I extracted the lag screws fastening the engine mounts to the bed stringers, the engine was free. Unfortunately, I still had to get its 500-pound bulk from under the cockpit sole out into the main cabin, where it could be lifted out of the boat.
Before I started moving the engine, I emptied the oil from the engine and the transmission, and I drained out the coolant. I expected that I would need to turn the engine on end to pass it through the companionway, and I was hoping to avoid a messy spill. The alternator also had to come off for the engine to fit through the engine hatch.
Next, I commandeered a 10-foot length of 2 x 12 the yard had lying around for scaffolding. I slid it between the engine rails and pushed it back until the aft end rode up on the hull as far as it would go. Lifting the board against the bottom of the engine, I used a small bottle jack to raise the forward end just enough to lift the mounts. With the board securely blocked at this attitude, it was a simple matter to drag the engine out into the main cabin with a come-along, taking care to keep the engine centered on the board.
When the crane came to unstep the masts (I was also rerigging), the accommodating operator also lifted the engine up through the companionway. The removal part of the job was done.
Article taken from Good Old Boat magazine: Volume 2, Number 6, November/December 1999.
This is first of a two-part series by well-known boating author Don Casey. Here he tells exactly how he extracted an Albin diesel from his good old boat.
(Next article: Insiders’ tricks for installing the new engine, shaft, and propeller – how to avoid a hernia and many other setbacks on the way to that magic moment when you turn the key, hit the starter, and fire up for the first time.)
For more on this article: Repowering Part 2 – Don Casey


