
New through-hulls and lessons learned during a marathon haulout
Issue 149: March/April 2023
I first stepped on a sailboat in 2015 and met my now-husband, Scott, at the helm. A friend brought me along and I was immediately taken by the easeful intensity of operating a vessel as a team around San Francisco Bay. We anchored at Angel Island for lunch and swimming. By the time we returned to Alameda, I was determined to get to know the guy, the hobby, and the lifestyle.

Scott Racette and Ashley Gremel before heading to their haulout. Photo by dock neighbor Jessie Zevalkink of Alekona.
A year and a half later, we purchased our 1979 Pearson 365 sloop and named it Azimuth. We were dreaming of distant shores and the first step was to begin living aboard and sailing Azimuth as often as possible. The boat had minimal problems at purchase and grew with us over the years. We steadily made upgrades with seaworthiness in mind — new lifelines, installing solar and new batteries, and purchasing new sails. I sewed a stack pack and leecloths. Scott chased down gremlins in the wiring and we got to know the Westerbeke 40. We added an inverter, which unlocked intermittent dreams of sewing and making waffles on anchor.
When Covid-19 confi ned us to living and working aboard, we decided it was time to prepare in earnest to take the big left turn out of the Golden Gate. Our project list overflowed with upgrades and replacements. Some of them were exciting creature comforts, like a new-to-us electric windlass and watermaker, but most were less glamorous efforts to fortify pre-existing systems: rewiring the 110-volt system, replacing the backing plates on the stanchions, swapping out 30-year-old water lines, and more.
Azimuth’s pre-existing hardware was in decent condition, but over 42 years old. It was time to upgrade!
We tackled many projects around our work schedules, turning our small living and working space into a construction zone. We became regulars at the chandlery and leaned into the isolation of stay-at-home orders by spending our time increasing the resilience of our vessel and growing our DIY skills. As we got closer to casting off, it became apparent that a large eff ort out of the water was needed for safety and peace of mind in big seas.
The haulout list included replacing through-hulls, chainplates, standing rigging, propeller, spreader lights, mast wiring, and the original wood mast step with a block of G10, as well as reinforcing the spreader attachment to the mast and putting on a fresh coat of bottom paint.
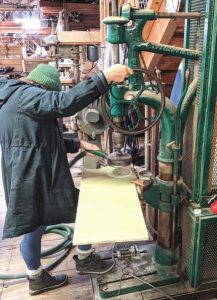
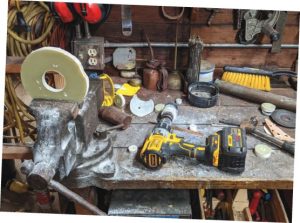
Making backing plates from a sheet of G10 using a turn-of-the-century drill press at Spaulding Marine Center.
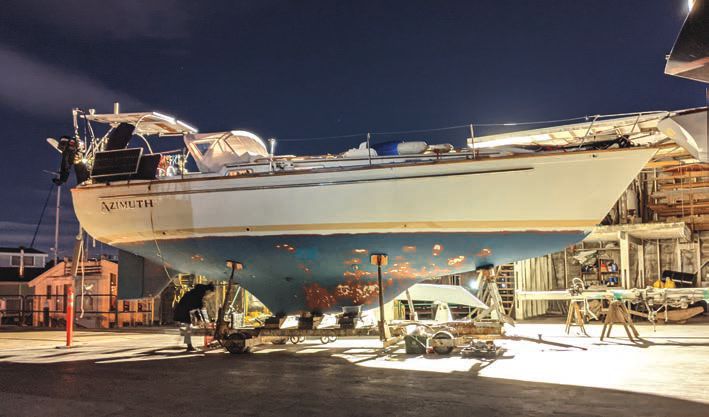
We hauled our boat out at Spaulding Marine Center, a small yard in Sausalito, California. We were abuzz, learning and finding enjoyable rhythms within the dawn-to-dusk work. The days started and ended in wool sweaters, peeled off in the height of the day. We were surrounded by old boats and experienced folks passing along helpful tips and nudges of encouragement. For all the progress we were making, though, one project loomed large and spanned our scheduled time in the yard — installing 11 hunks of specialty bronze through-hulls.
If 11 sounds like a lot, Scott and I agree with you. Two sinks drain overboard via through-hull assemblies; the head has one fitting to empty and another to fill with sea water. The engine and V-drive share a through-hull to pull sea water into the boat to circulate through the systems. Two cockpit drains and four deck drains terminate in through-hulls an inch above the waterline. There’s one last one for the watermaker intake. Astute readers will count 12, but the galley sink tees into a cockpit drain.
As seems to be a theme with this haulout work, our through-hull assemblies were original and over 42 years old. They hadn’t given us significant issues, but we wanted to front-load any upgrades prior to sailing from California to the Chesapeake Bay via the Panama Canal.
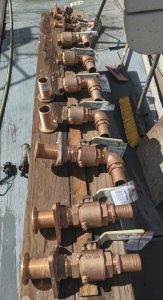
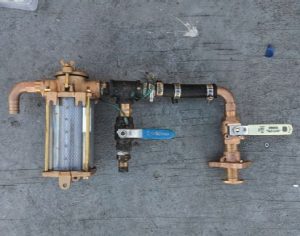
The lineup of fresh through-hull assemblies and backing plates ready for install.
Removing the through-hulls was fairly easy. Some loosened with the step wrench alone and we used an angle grinder to remove the rest. The original through-hulls had some lead content, so it was important to mask up.
One evening, we were able to use the turn-of-the-century drill press at the yard to make our backing plates out of a 1-inch sheet of G10. The donuts were achieved with two hole saw bits — the larger on the drill press, and the smaller using a hand drill and vice. We later drilled and tapped three bolt holes in each. This tapping work was a nice project to do in between larger projects or while puzzling on how to proceed next.
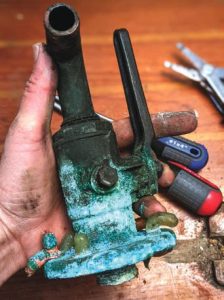
In the year or so prior to our haulout, Scott had become aware of an issue with the installation of other through-hull assemblies — the pairing of untapered threading with tapered threading. Seacocks typically have a tapered female end, which is often matched with a male straight-threaded through-hull. This incompatibility can lead to a weak connection of only a few overlapping threads, with potentially catastrophic results. The flange base adapters that we used have straight thread on the bottom and are tapered on the top. This enables a secure fitting with the tapered seacock and straight mushroom.
Finishing off the backing plate donuts. One was cut a bit too close and looks like a small bite was taken out of it.
An article on the topic was extremely helpful in understanding the problem, what we needed, and the technique to ensure the replacements were installed correctly. For the new through-hull assemblies and seacocks, we went with a variety of Groco products including the through-hull fittings themselves, both in ¾-inch and 1 ½-inch sizes, tri-flange base adapters, seacocks, several 90-degree elbows for the tighter spaces, a Perko intake strainer, and barb adapters for the hose connections. Our pocketbooks lightened when these were delivered and we admired them gleaming in the sun.
Next came test fitting. To determine how much of the threaded portion needed to be trimmed, one of us stood outside the boat with a step wrench and larger wrench for leverage, while the other threaded the flange base from inside. Once done, we used a bandsaw to cut them down to size. We performed another test fit to ensure the seacock handle would have necessary clearance to open and close. The orientation of the flange bases was marked on the hull and we did another test before adding 3M 4200 sealant and securing them.
The through-hull project marched along slowly with our work on the mast, prop, and other odds and ends. For all the progress we were making, the boat would still sink if launched. We had a back-against-thewall sort of feeling that was a teaser for some of the problem-solving we’d be doing once we got underway.
For years, my inclination was to dwell on the planning stage, diagramming dependent steps and talking through who does what and when. While in the yard, my approach shifted by necessity. We were only frustrating ourselves by saying, “Today I’ll install X,Y,Z,” or, “Next Wednesday this will be done.” I decided to focus on the inputs rather than the outputs and attuned to the tiny steps that got me moving to a new vantage point.
New raw water strainer assembly waiting for install.
Extraordinarily messy lists became my spell for casting aside analysis paralysis. On large legal pads, I thought through some of the biggest projects and plans for the boat, adding items as needed. My characteristically sloppy cursive added a certain flare that read like incremental progress over perfectionism. Then, when tasks were finished, I scratched them off in the messiest way possible, which was very satisfying.
Writing this sort of list activated my brain to go small and steady. This “can-do list” included gathering items and know-how, rather than just the finished product. I added things to research, how-to videos to watch, supplies to order, clearing space to work, advice to request, measurements to make, and other tiny next steps. Drinking water has made the list, and so has taking a break. While in the yard, I was crafting a new list every day. This meant we were making solid progress.
This menu of options boosts my confidence and mood, which is not to be overlooked when completing a marathon DIY haulout. Time in the boatyard taught us about staying on course when the work feels impossible or unknowable. By the end, the repetition of learning new things made each project feel like arts and crafts, reduced to precise measuring and cutting, attachment methods, and creativity for the inevitable unexpected challenge.
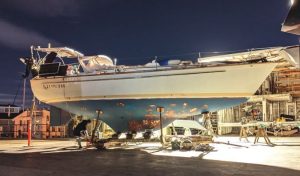
Long days and nights with Azimuth on the hard in Sausalito, California.
At 3 a.m. on the night before we were set to splash, we twisted in the final through-hull and collapsed into the V-berth. The next morning, we watched nervously as Azimuth was lowered back into the water. As the hull slipped from view to the water below, one of the yard workers let out a shout. For a moment, it seemed our worst fears had come to light, but we shortly found out that a dog snoozing on the dock had startled the worker. We stepped aboard, confirmed the watertight seal of each fitting, and gave another sigh of relief. The next day we dropped the mast into place and tensioned our DIY rig.
Our project list was as short as ever. We felt completely exhausted, but invincible. We knew Azimuth more intimately than ever before and had done so many things for the first time. We had let go of our slip in Alameda before heading to the yard, so this was our soft opening to casting off for parts unknown, and we sailed up the Sacramento River to decompress in the delta. Looking back, I’m so proud of us bedraggled sailors for piecing together the skills and resources to do the jobs right and get back in the water. Now, 7,000 miles later, we are still meeting new obstacles with that same can-do spirit.
Ashley Gremel is a writer, maker, and problem-solver. She is currently sailing from San Francisco to the Chesapeake Bay with her husband, Scott Racette, and their salty cat, Cypress. The trio plans to settle down in Richmond,Virginia, laterthis year. Ashley writes weekly at cloudsformoverland.substack.com.
Thank you to Sailrite Enterprises, Inc., for providing free access to back issues of Good Old Boat through intellectual property rights. Sailrite.com

