

Crafting a traditional interior look and feel with a little ingenuity
Issue 150: May/June 2023
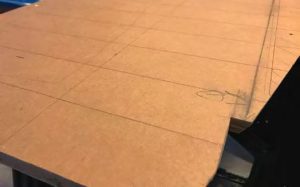
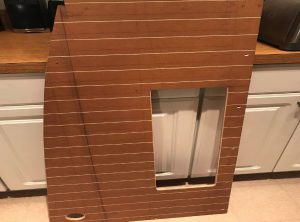
Bulkhead with lines drawn, ready for the router.
Calypso is the 1976 Bristol Channel Cutter we’ve owned since 1992. As you might expect, we’ve put her through a couple of different refits over the years, making her fit for our different needs. Some things — like the countertops and lighting — we’ve changed with impunity; others we’ve worked hard to bring back to a more traditional appearance. But matching finishes that were installed in 1976 when you’re dealing with 21st-century availability can be challenging. Sometimes, though, it’s not as hard as you might think.
We love the texture of the original woodwork below. All the bulkheads, at least the visible parts not hidden inside cabinetry, have a layer of 2.5-inch-wide tongue-and-groove cedar strips on top. Trying to match that look with off-the-shelf products proved almost impossible.
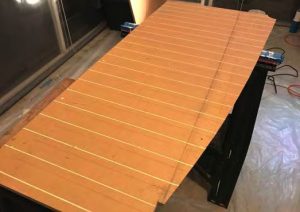
Bulkhead with grooves routered.
The standard BCC finish for these surfaces, when the Sam L. Morse company was offering completed boats, is a fiberglass liner with that same V-notch cut in. By any of our research methods, that was not available. The only off-the-shelf product that is remotely close is beadboard — and frankly, it’s not even remotely close. When we did the first interior refit back in the early 1990s, we reluctantly put in that beadboard where we needed a finish, on the theory that something was better than nothing.
I now think nothing might have been better than the beadboard, which looks like someone ran a bead of sealant between two pieces of wood, leaving two threads on either side of a bulb. Besides the fact that any crack in a surface will gather dust on a boat is the other fact that it completely does not match our existing wood finish. Even when it’s painted, it doesn’t look the same.
Fast forward to 2018, when we started the latest round of “make this boat the way we want it.” Out came the forward berth with its beadboard finish. Out came the galley and the engine cover and the quarter berth. Pretty much any of the surfaces we’d originally covered with beadboard were on the “redo completely” list. There were still a lot of original bulkheads with that original V-notch look. We definitely wanted to recreate that and match it as closely as possible. Now what?
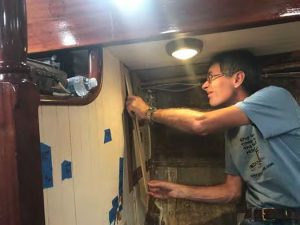
Jeremy installs one of the ash slats on the bulkhead.
The first thought was to use individual strips of wood. Jeremy ripped some poplar into strips, planed them to the right thickness, then angled the edge off to create a grooved look. A few small nails and a bit of glue later, we had a reasonable-looking match for the original cedar strips.
This took a while, though, between ripping the wood to the right thickness and routering each side, then affixing each piece individually to the bulkhead. We had a lot of this to do in the chart table/quarter berth, engine space, and galley — all areas where thankfully we’re not having to match the existing spacing. The idea of dealing with all those individual pieces of wood was not appealing, especially since we were installing all new bulkheads anyway. Why install new bulkheads and then add a whole other layer on top? We figured there had to be a way to combine the process.
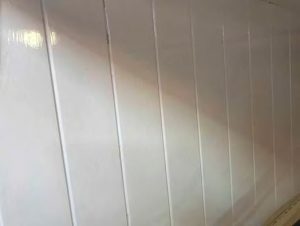
Original tongue and groove with new ash slats. Painted, it’s a very close match even on adjoining surfaces.
It must have been when we were using the router for some other project that we hit on the idea. What about taking a piece of plywood (which will be used to make the bulkheads anyway) and running a groove through it with a router?
This shortcut turned out to be the perfect solution. By cutting the grooves at the proper spacing and setting the router bit to the correct depth, we wound up with a fairly close approximation of the original appearance. We did a test piece first, both to check the look and also to get the router depth right.
Like a lot of shortcuts, this one took some attention to detail and a few moments of trial and error. The biggest challenge was crafting a makeshift router guide so the grooves would be straight; this is not a place to test your freehand router skills.
Jeremy worked with the plywood for each new bulkhead separately, cutting it to size but leaving any cutouts until after the groove work. He laid each plywood piece on a table, then pulled out the 6-foot metal ruler he often uses as a straight edge; in this case, it served double duty as the router guide. He drew all the lines on the plywood before starting the router work.
Navigation locker bulkhead, grooves cut and access hole cut.
There were a lot of clamps involved in the cutting stage. The plywood was clamped to the table. The metal ruler/router guide had its own set of clamps, and these needed to be placed in such a way that the router had space to finish its run. Sometimes it felt like it took longer to reposition the clamps than it did to make each router pass to create the grooves.
Once the grooves had been cut, we smoothed the notches out with a piece of sandpaper to remove any visible burrs. Then Jeremy cut out any openings. Doing this before cutting the notches would make the notch-cutting harder, since you would have multiple router runs to do for each section. If we could paint before installation, we did; generally, our feeling is that it’s a lot easier to paint a horizontal surface than a vertical one.
In the end, we came away with the interior we wanted and a faster way to make the boat beautiful inside. We’ll take it!
Nica Waters and her husband, Jeremy, sail their Bristol Channel Cutter, Calypso, when they’re not refitting her. Now that they’ve added a second BCC to the fleet, the ratio of work to sailing time has increased. You can listen to more of her on the Boat Galley podcast at theboatgalley.com.
Thank you to Sailrite Enterprises, Inc., for providing free access to back issues of Good Old Boat through intellectual property rights. Sailrite.com


