

Build a one-off holding tank
Like most good old boats, All Ways, my 28-foot Pearson Triton, was built with an overboard discharge marine head. Since my favorite cruising area was recently declared a No Discharge Zone (NDZ), installing a holding tank became an important priority in my refit. The previous owner had installed a 2-gallon plastic “tank” that fulfilled the law but was of little real use. (He bragged that he never had an odor problem since the tank had never had sewage in it!) I wanted a tank that was large enough for at least several days for two of us.
My first step was to research the proper design and installation of a marine sanitation device (MSD). That search led me directly to Peggie Hall of Peal Products and her publication, Marine Sanitation: Fact vs. Folklore. For a complimentary copy, send her an email. It is easily the clearest, most concise discourse I have ever seen on the subject. Peggie is also a good source of information. Her company sells a huge variety of rotomolded polyethylene tanks to fit many installations.
Location
Unfortunately, even after Peggie sent me several pages of dimensions, we could not find one that fit perfectly in the V-area of my forward berth. A review of options available from Defender, West Marine, and BoatU.S. yielded far fewer choices and still nothing that really fit. I decided to build my own one-off fiberglass holding tank. Here is the thought process that went into my final choice. I wanted:
- As large a tank as practical. (Initial calculations suggested 35 gallons, but I finally decided on 20 gallons as a minimum.)
- To keep the head-to-tank hoses as short as possible. (To aid in odor prevention, you should pump the discharge line dry after each flush. The longer the hose, the more water it takes to flush the line, and the quicker your tank fills up.)
- To have as little negative effect from the weight as possible on vessel trim. (Ideally this would put the holding tank in the bilge, however midline, and not in the bow, was a reasonable compromise.)
- To avoid odor at all costs. (Following Peggie’s recommendations, this meant two large-diameter vent lines, one forward to the bow and one aft by the discharge line to create cross ventilation.)
- To make use of the V-berth area. I had already decided to make the V-berth into a large double bed. Therefore the area underneath was available. The area was a rectangular trapezoid, 31 inches wide at the base, 20 inches at the top, 21 inches long, and 20 inches high. That calculates to 35 gal. Allowing for space at the top for hose access drops the height to 16 inches which, allowing for wall thickness, yields a 32-gallon capacity.
Other choices considered and rejected included:
- Behind the head (An excellent article in BoatBuilder, XIV:6 details such an installation) – too small.
- In the forecastle – too far forward for weight, difficult to work in.
- Under both sides of the V using flexible bladders – plumbing complex (two tanks) and concerns about odor in flex tanks.
- In the hanging locker opposite the head – plumbing complex (hoses need to cross midline of boat – no place to do that).
- Under the port berth – unbalanced location, marginal size.
Plumbing and Materials
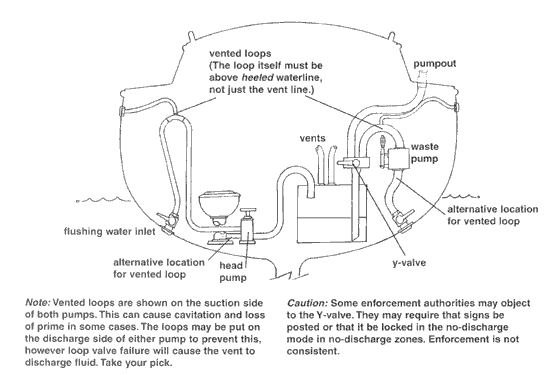
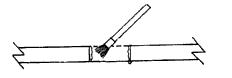
Having decided on the location, the next issue was plumbing. The West Marine catalog has a nice set of diagrams showing the various options for plumbing a marine head. Given that most of my cruising would be in an NDZ, I chose to route all discharge into the holding tank but to maintain the option of emptying the tank overboard when beyond the three-mile limit. That yielded a relatively simple design with only one Y-valve as shown at left.
The final decision was construction of the tank. I elected to use a pure fiberglass construction with polyester resin. I rejected epoxy over plywood because I just did not trust it to remain laminated. (Polyester over plywood was out of the question.) I also rejected epoxy/fiberglass as much more expensive. Plus, I had some resin, mat, and roving left from my deck repair and was comfortable working with it. The only real drawback to polyester compared to epoxy for one-off construction is that you cannot use foam to construct your plug, as the resin will dissolve the foam. Since this was a truly one-off construction with no thought of ever making a second, there was no need to construct a durable plug. I decided to make the plug out of drywall (also known as Sheetrock). It is cheap, easy to work with, and easy to destroy. The corners can be nicely rounded using joint compound (“mud”) and tape.
The Plug
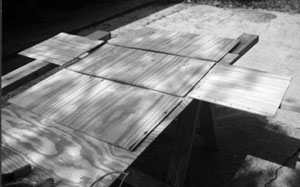
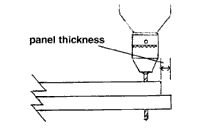
To build the plug, first determine the outside dimensions of the final tank (allow clearance inside your space). Before proceeding, be sure the finished tank will fit through the companionway and any doorways necessary to install it. In getting the angles right for the trapezoid, I first cut a pattern from cardboard. Using a rectangle and two triangles, I maneuvered them into place and taped them together fixing the final shape. Using this as a starting point, I calculated the dimensions of the plug. The following calculation derives the inside dimensions of the panels. I subtracted 1/2 inch from each outside dimension of the cardboard mockup to allow for 1/4 inch wall thickness all around. Because I was using 1/2-inch drywall, I subtracted another inch for the thickness of the panels making the plug. I did this to all dimensions because I did not want the sides to overlap the top. I added 3 inches to the height.
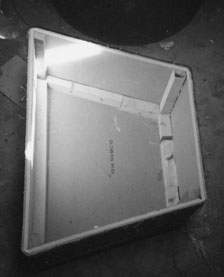
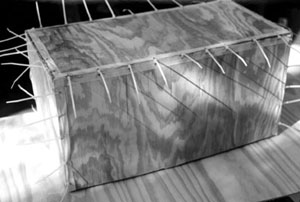
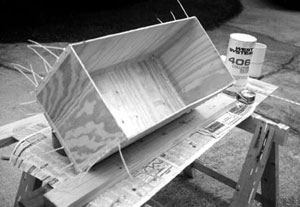
Tank with mold inside shows framing and corners.
This allowed me to cut the finished tank apart, remove the plug, taper the edges, and reassemble the tank. I cut out the panels and assembled the plug using softwood nailing blocks on all corners. If you are making a trapezoid like mine, this will require ripping some of the blocks to the proper angle. This is easily done on a table saw (set the top on the table and tilt the blade to match), but could also be done on a band saw or even with a hand plane – great accuracy is not needed. I used a Sureform rasp to round all edges, eliminating the corner at each edge.
The resulting radius should be covered with “mud” and tape, smoothing it with your hand. Remember, this is the inside of the tank. No one will see it; it just has to be smooth enough to release well. Test fit your plug before proceeding, remembering that the actual tank will be roughly 1/2 inch larger overall. Paint the plug with primer, and apply two coats of auto polish, buffing each coat out. The wax acts as a release agent.
One of the nice things about working with polyester is that as long as you do not use finishing resin (which contains wax), you get a chemical bond between layers even if you don’t work “wet-on-wet.” There is no amine blush to worry about and no sanding between layers.
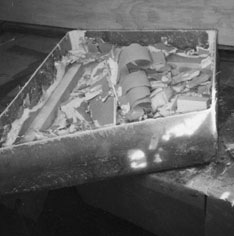
Smash dry wall to remove it.
The Tank
Cover the bottom with two layers of mat (1.5 oz.) and a layer of biply (24 oz. roving with 1.5 oz. mat attached) wet-on-wet, with roving to the inside and mat to the outside, and let it dry at least to where it can be handled. The fiberglass should be folded over the edges about 2 inches. Apply the same schedule to the top. You can either let this dry or proceed directly to the next step, depending on your comfort with working on a vertical surface. Wrap two layers of mat and a layer of biply around the sides in one continuous length, staggering the seams. If the top is still wet, this must be done vertically but it really is not that hard, just messy. (Be sure to wear long sleeves and good gloves in addition to your respirator.) If you elect to let the top dry first, the plug can be turned on its side and rotated while three of the four sides are applied, then turned back upright to apply the fourth. Of course, you will have to repeat the process three times to get all the layers on. I am not sure this is really easier – I did it the first way. Apply another layer of biply to the top and bottom (waiting for one to dry before turning it over), again overlapping 2 inches.
A note on fiberglass schedules: The double layer of mat on the inside is necessary to ensure that the tank will be waterproof. My finished tank has a schedule of mat-mat-roving-mat-roving-mat with double that on the edges. It is about 1/4 inch thick and nearly bomb-proof. You can certainly use alternative schedules; the important features are the double layer of mat on the inside and a layer of mat between layers of roving to ensure good bonding. Cloth or non-woven bi- or tri-directional fiberglass could be used, but cost significantly more and are not needed in this application.

The Fun Begins
Measure down 3 inches from your 2-inch overlap, and draw a line all the way around the tank. Using a circular saw with a carbide blade or a jigsaw with a fiberglass blade, cut the tank in half along this line. Remove the plug. Unless you did a better job of waxing the plug than I did, this will involve smashing the drywall and peeling it off the fiberglass in pieces. (A trick that I learned after this project is to coat the plug at the last minute with no-stick cooking spray just before applying the laminate. I am not sure if it would allow the plug to pop out intact, but it is worth trying.)
Now is the time to install a baffle if you want one. It can be fiberglass or coated plywood since the worst that will happen is that it will slowly decay, leaving a tank with no baffle. Paint the interior of the tank with primer and gloss enamel to make it easy to keep clean. Leave a 3-inch band unpainted on the lip of the top.
Sand or grind (a 7-inch right-angle grinder does a great job here, but a belt sander works) a 3-inch scarf on the inside of the top and the outside of the bottom. Great accuracy is not needed; just draw a reference line at 3 inches to start and taper to a feather edge. Wet out the scarf with straight catalyzed resin. Make a glue by adding chopped fibers (easily made by cutting your scraps into 1/4-inch pieces) to the resin, apply this to the joint, and assemble the two halves of the tank, smoothing the squeezed-out glue with a putty knife. Be sure to tap the top into place until it is parallel with the bottom. Wrap another layer of biply around the sides of the tank. If you want a non-tacky finish, you can either use finishing resin for this step or wrap the tank in plastic wrap while it dries. The top and bottom can likewise be coated with finishing resin or with plain resin and covered with plastic, but this is entirely optional.
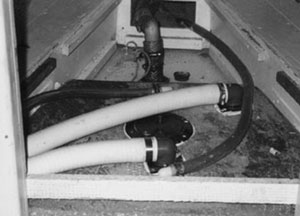
Finished tank installed with connections at the top.
Test fit the tank again. (It had better fit!) I had to grind the lower corners a bit as the overlaps created a total thickness of more than 1/2 inch. With the tank in place, mark locations for the clean-out, vent lines, and sewer lines. I used a 5-inch clean-out, 3/4-inch thru-hulls for the vent lines, and 1 1/2-inch right-angle elbows glued into flanged fittings I got from an RV outlet for the sewer connections. (1 1/2-inch thru-hulls stood too high.) Remove the tank, cut the necessary holes, and install the clean-out and fittings using plenty of 5200 sealant. (Make sure you can reach the underside of each fitting through the clean-out before cutting the holes – you may have to relocate something to accomplish this.) You may want to place the tank in the boat before setting the final direction of the fittings to be sure any critical angles are correct. Be sure the pickup tube reaches nearly to the bottom of the tank; I cut a 45-degree angle on the end of the tube and let the tip hit the bottom to ensure placement. You probably want the vent lines and discharge into the tank to be near the centerline of the boat so that they are not submerged on either tack, but the pump-out can be at the most convenient corner.
Installation
Finally, install the tank permanently in place, being sure it is blocked securely so it cannot shift or rub underway. I used some of the urethane foam-in-a-can that is sold for caulking to create an exact fit along the edges. Attach all hoses securely, double clamping below the waterline and including a vented loop if necessary. Now go cruising in your good old boat and enjoy the independence of a truly custom marine sanitation system!
Play it Safe
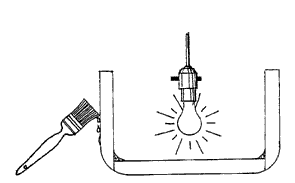
Being an ER doc in real life, I have perhaps a greater than average concern for the toxicology of the chemicals we use in working on our good old boats. It turns out that both epoxy and polyester resins are potentially very dangerous – but in entirely different ways. The dangers of epoxy resin are well addressed in the Gougeon Brothers’ On Boat Construction. Put in the simplest terms, epoxy in liquid form is dangerous if you get it on your skin. It is not dangerous to breathe, as is gives off no volatiles. Therefore, when working with epoxy resin, you must wear gloves and long sleeves at all times, but (contrary to popular belief) you do not need a respirator. Epoxy dust, however, is toxic if inhaled, so you should wear a particulate respirator whenever sanding or cutting epoxy.
Polyester resin, on the other hand, is very toxic if the volatile gases released during cure are inhaled. (I use the generic term polyester to refer to both isothalic and orthothalic polyester as well as the slightly different vinylester.) Breathing even relatively small amounts can cause permanent brain, kidney, and/or liver damage. It is, therefore, mandatory that people working with polyester resin wear respirators rated for organic vapors. These are the canister types that usually have charcoal filters which must be changed periodically. A good rule of thumb is: if you can smell it – don’t. Change your respirator, get better ventilation, or do something so you cannot smell the polyester, and you should be safe.
Given an understanding and respect for the differing toxicities, both epoxy and polyester can be used safely, and each has its advantages and disadvantages. Epoxy is a much better glue; it sticks (bonds mechanically) to things better than polyester. Once it is cured, however, subsequent coats must rely on secondary (again, mechanical) bonds. In contrast, polyester can bond chemically to itself – regardless of the time lapse. This obviously results in a stronger bond. Epoxy is more flexible than polyester. This can be an advantage or disadvantage, depending on your application. The rate of cure of polyester can be adjusted by the amount of catalyst added; epoxy resin and hardener must be mixed in a fixed ratio with the rate of hardening determined by the particular hardener chosen. You can use fiberglass cloth or roving with either resin, though the more exotic fibers (kevlar, carbon, etc.) are usually coupled with epoxy because their properties are more complimentary. You must not, however, use mat with epoxy, even though I have seen other authors recommend it. The binder in mat is dissolved by the styrene in polyester, but will be unaffected by the epoxy. Therefore use with epoxy will result in incomplete saturation and very weak laminate.
An excellent source of information on the pros and cons of epoxy and polyester is LBI, Inc. of Groton, Conn., (800-231-6537). They sell epoxy and polyester and have years of experience with both. Their catalog is informative, and the owners will answer any questions and make recommendations regarding choosing between epoxy and polyester for a given project. Of course, the Gougeon Brothers’ technical department is very knowledgeable and anxious to answer any of your questions about West System epoxy. They may be somewhat biased, however, as they neither make nor sell polyesters. The same can be said for System Three which publishes a very entertaining and informative booklet on using epoxy but does not deal with polyester.
Consider a stitch-and-glue holding tank
When you purchase an older boat, it’s inevitable that some things will need to be changed, repaired, or enlarged. Holding tanks are often on the list of things that must be added or enlarged. An older boat may lack any holding tank at all, and many newer boats have tanks that are too small.
There are a number of commercially available tanks listed in boating catalogs, however these may be in shapes that don’t use the available space on your boat to its best advantage. And it may be expensive to have a custom tank made for your boat. If you like working on your boat and have the time and inclination, you can make your own holding tank. Tanks of a wood/epoxy composite have been used successfully for many applications.
The first step in designing and building a holding tank is determining its location. Several criteria are obvious. The holding tank should be located close to the head. It should have a fairly direct route for the hoses to run from the head to the tank and from the tank to the deck pump-out fitting. Ideally, the tank should be as low as or lower than the head. You will have fewer odor problems if you can avoid waste collecting in the hoses. If you have to pump the head uphill to reach the holding tank, the chance of waste remaining in the hose is greater. Another criterion is accessibility. After you have constructed it, you have to be able to install the tank in the area you choose. This area can be any shape. Available spaces in boats usually have sides and edges of varied angles. This is what makes commercially available tanks so inefficient in using your space.
Make a Mock-up
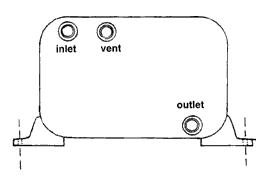
The next step in designing your tank is making a mock-up of it. Using cardboard from an old appliance carton and a roll of duct tape, make a full-size model of the tank. Rough dimensions and angles can be figured with a ruler and bevel tool. When making the tank model, be sure to determine where the inlet and outlet hoses will be located and leave room for routing them to their destinations and attaching the hoses and hose clamps after the tank is in place.
Also leave room for the vent hose at the top of the tank. The inlet hose should connect to a 1 1/2-inch thru-hull at the top of one side of the tank. The outlet hose should connect to a 1 1/2-inch thru-hull at the bottom of one side of the tank. The vent hose should be at least 5/8-inch with an appropriate thru-hull in either the top of the tank (ideal place), or on one end as high as possible.
Once the model is constructed, you are satisfied that it is going to fit, and it is the most efficient use of the area selected, you can begin construction. For tanks in the 20- to 30-gallon range, purchase a sheet of 1/4-inch exterior BC-grade plywood (the type with one smooth side). For an estimate of tank size, use the formula for rectangular tanks: U.S. gallons = H x W x L / 231. Take your mock-up model of the tank apart, and use the pieces as patterns for your tank. Mark your tank pieces on the sheet of plywood, making sure the smooth side of the plywood is to be the interior of the tank. After the pieces are marked on the plywood, cut them out using a sabre saw. It might be wise to label the pieces.
Using a 1/8- to 3/16- inch drill bit, drill holes along all the edges of the pieces about 1/4 inch from the edge, 1 1/2 inches apart except for the edges of the sides adjacent to the top and the edges of the top of the tank. When drilling the holes, place pieces that will be adjacent together and drill through both of them so the holes will be aligned (see illustration at left).
Now assemble the tank by stitching the pieces together using heavy monofilament fishing line or small nylon wire ties, which are my preference. Before stitching the pieces together, place a strip of 1-inch-wide masking tape along the outside edge of the pieces covering the holes. This will prevent the epoxy from leaking through when gluing. When stitching the pieces together, leave the knots or clamps of the wire ties on the outside of the tank where they can be cut off later (see illustration “a”). After the tank is stitched together, except for the top, which is completed last, use scrap blocks of wood to prop the tank on newspapers, arranging the joint you want to work on first with its apex down (see photo).
There are a few precautions to observe when working with epoxy. Although the fumes from epoxy resin are not as pungent as those from polyester resin, you must have proper ventilation. Use disposable latex gloves and wear an old long-sleeved shirt. Most marine catalogs carry the necessary supplies.
Mix epoxy resin and hardener and, using a disposable acid brush, paint the area along the interior edges to approximately 3 inches from the joint. Now add some West System 406 filler to the epoxy/hardener mix to make a putty of mayonnaise consistency and, using a tongue depressor, work it into the joint on the inside of the tank. Note: depending on the temperature, do not mix up more epoxy/hardener than can be used in 8 to 10 minutes as it will “kick” before it can all be used. The putty mixture should extend about 1 inch on both sides of the joint and cover the stitches.
Now, cut a piece of 4-inch wide fiberglass tape the length of the joint. Lay this tape over the putty, and extend it up on both sides of the tank. Using an acid brush, thoroughly wet out the tape with an epoxy/hardener mix with no fillers. Repeat this process with all the interior edges of the tank, turning the tank as you work with each joint. When the epoxy has kicked, cut the monofilament line or wire ties using a pair of diagonal pliers and remove the masking tape on the exterior of the tank.
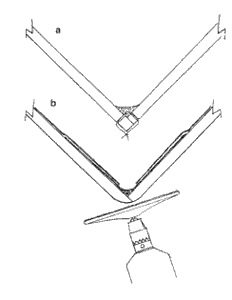
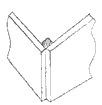
a.) Filet covers stitch in corner. Leave tie knots on the outside. b.) Cover the corner with cloth. Overlap cloth with cloth from panels. Round outside corner.
Sand the area, and round the edges and corners into a smooth radius. Turn the tank upside down and, using an acid brush, paint an area 3-inches wide along the exterior corners with epoxy/hardener mix. Now lay a piece of 4-inch wide fiberglass tape over the joint, wet it out with epoxy/hardener mix, and squeegee out the trapped air. Allow this epoxy to harden before proceeding.
Next, cut pieces of 6-ounce fiberglass cloth to cover the interior panels of the tank. Cut these pieces to overlap the 4-inch wide tape on the interior corners. Sand the rough edges around the interior joints and wipe down with a Scotchbrite pad and water to remove the dust and any “blush” on the cured epoxy. This blush is a film that forms on the surface of epoxy when it cures. It is water-soluble and washes off easily. After the surface has dried, wet the interior of the tank with epoxy/hardener mix, using an acid brush or a 1- or 2-inch disposable paintbrush. Lay the pieces of fiberglass on the interior panels of the tank, wet them out, and squeegee the panels to be sure the cloth is fully saturated and trapped air is removed. While laying the cloth on the interior of the tank, also put a layer of cloth on the piece of plywood that forms the inside of the top of the tank.
For rigidity, add one or more baffles to the interior of the tank. Cut a piece of plywood that will fit snugly across the width of the interior of the tank. It should be cut so that when it is in place there is at least a 1-inch clearance on the top and 2 inches of clearance on the bottom. This is so waste will not hang up in the tank. When it is in place, lay the tank on its side and work in a mixture of epoxy/ hardener with filler into the joint in a 1-inch radius fillet on both sides of the baffle and tank. Cover this joint with 4-inch fiberglass tape. The baffle can be covered with fiberglass cloth either before or after it is epoxied in place, making sure the edges are saturated with epoxy and covered with the cloth.
The interior now gets a minimum of 20 mils of epoxy barrier coat. This translates into at least six coats of epoxy rolled on the interior surfaces with a foam roller and brushed out to remove any air bubbles. The interior should be kept warm with a fairly high wattage incandescent light bulb while the epoxy cures. This will ensure that there is maximum cross-linking and curing. Watch out for any potential fire hazard. Also apply the barrier coat to the inside of the piece for the top of the tank.
The outside of the tank does not need to be covered with cloth but should be given a coat of epoxy/ hardener mix to protect it from abrasion. Additional abrasion protection can be achieved with a layer of cloth, but it is optional depending on the location of the tank. If the cloth is added, it should be done before the thru-hulls are installed.
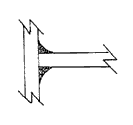
Baffle/joint detail
Determine where you want the thru-hulls located, and cut a slightly oversized hole for each one. Place masking tape over the holes on the inside. Then turn the tank so the holes are up, and thoroughly coat the edges of the holes with epoxy/hardener mix and allow it to cure. Remove the tape and – with a rasp, file, or coarse sandpaper – enlarge the hole so the thru-hull will fit. Make sure no bare wood is exposed. The thru-hulls can now be installed with a good bedding compound. If a gauge is desired, it also should be installed in the top, following the same procedure as for the thru-hulls.
You are ready to install the top of the tank. With an acid brush, coat the top edge of the tank with the epoxy/ hardener mix. Then mix in a little filler, and coat the top edge of the tank again. Lay the top on the tank, making sure it is aligned. Place a weight on the top to ensure that it doesn’t shift and, after scraping off any excess from the outside of the joint, allow it to cure.
After it has cured, sand the edge, rounding it into a 1/2-inch radius, as fiberglass cloth doesn’t like to go around a sharp corner. Coat the top and adjacent sides with epoxy/hardener mix for about 3 inches, and cover the corner with 4-inch wide fiberglass cloth tape. Wet the tape out with the mix, squeegee out any air, and allow it to cure.
Coating the inside of the thru-hull openings
The tank is basically finished. If fasteners are required to prevent the tank from shifting after installation, tabs made from the plywood should be fastened to the tank with epoxy/hardener and filler added (see illustration on Page 56). These tabs should be coated with epoxy and cloth for added strength. Fasteners are attached to these tabs to hold the tank in place. For appearance, the tank may be painted. When installed, the hoses should have double hose clamps with top-quality stainless steel clamps on each thru-hull.
The actual construction of the tank is much less complicated than it would seem from reading this article. It isn’t difficult and results in an excellent tank. Holding tanks may not be a topic you like to think about, but as more waters are declared no-discharge areas, the topic becomes more important.
Questions are asked regarding epoxy/wood composite tanks for potable (drinking) water and fuel tanks. They have been used for both with success. However, the Gougeon Brothers (West System) does not encourage their use for potable water and gasoline fuel. The rationale is that because they cannot control the cure process to ensure the proper resin/hardener ratio and cure temperature (temperature should be several hours at 150 to 2000F) for the barrier coat, they don’t encourage its use. With potable water tanks, improper cure may possibly result in extractives in the water. In commercial manufacturing applications, this process is strictly controlled and, as a result, epoxy-lined containers and pipes are used in many applications that carry the food and drinks we use each day.
Regarding fuel tanks, the Gougeon Brothers’ literature is ambiguous. With gasoline tanks, the constantly changing fuel chemistry, because of fuel additives and blends, does not guarantee that in the future fuels will be compatible with epoxy coatings. However at present, there is no problem. So Gougeon does not encourage composite tanks for gasoline. Diesel fuel poses no threat to epoxy, and it is often used to repair metal diesel fuel tanks.
However, before constructing a diesel fuel tank with epoxy/wood composite, the Gougeon Brothers recommend checking with your insurance carrier regarding any restrictions on their use. Any increase in your insurance premium might offset any savings in the construction of the tank.
Holding tanks, however, have no such restrictions. In fact, the U.S. Coast Guard does not certify any holding tanks, only the head itself and its discharge into the waters. A home-built epoxy/wood composite holding tank is an excellent way to get the most tank for your space at an economical price.


